~
PineConeLady's Glittery Pinecone Oranament ~

A fun, colorful tree decoration or use them in baskets
Pinecones & Materials Needed ~
Pinecones ~ Red Norway Pine, Austrian Black, Small or Medium Pitch Pine.
{Use ones that are lighter in weight.}
Craft Glitter ~ We mix pink or purple with silver, and orange mixed with gold.
Metal eyelet screws
Hanging string or cording
How to Put it All Together ~
1. With a disposable foam paintbrush, dab white craft glue on the other edges of the scales. {Petals}
2.
Hold the cone over a small bowl, and sprinkle it with spoonfuls of
glitter, letting the excess fall back into the bowl.
3.
Stand cone upright to dry.
4.
Make a hanger by inserting a metal eyelet pin at the top or tie the string or cording to the topmost scale!
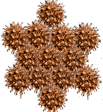
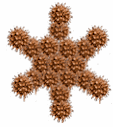
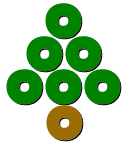
Pinecone Christmas Trees
Using Putka Pods or Casuarina Pods or Sea Shells
Pinecones & Materials Needed~
Pine cones
-
Flat bottom Pinecones that are "tree" shaped and stand upright without tipping over.
For Nice Big Trees: ~ Longleaf Pines are awesome.
For Small Trees ~ Austrian Black or Pitch Pine.
Make sure the Pinecone you choose is fully opened with a flat bottom.
Bag of small to medium Sea Shells or
Multi-Colored Casuarina Pods
Glue Gun and Glue Sticks
or Regular Clear Drying Glue
How to Put it All Together ~
1. Dab a drop of glue or hot glue on a few petals of the pinecone.
2.
Take a seashell or colored pod and stick it in the glue.
3.
Do every single petal.
4.
Glue the Starfish on the top petal for the "Tree topper".
For smaller cones, they make wonderful tree ornaments by tying cording around the topmost pinecone petals.
The larger cones such as a Big Longleaf Pine, looks great standing on it's own or in a group of Sea Shell or Pod cones in varying heights.
~ Fragrant Holiday Spice Pinecones ~
Pinecones & Materials Needed ~
Any pine cone will work for this project.
Any brand of white glue
Ground Holiday-type spices such as: Cinnamon, Nutmeg, Cloves, Allspice
Optional: Basket or Bowl
Pine or Spruce branches
Ribbon
How to Put it All Together ~
1. Paint edges of pinecones with white glue and sprinkle with spice (or spices) of your choice. Tap off excess spice. Let dry.
2.
Attach a ribbon to the top or bottom of the pinecone for an ornament. Or you can use them as a decorative accent by putting them into a holiday
bowl or basket. If you'd like, add some pine or spruce branches for the total 'Holiday' Scent that smells like Christmas!
This is another simple craft to do with children!
PineConeLady's Pine Cone Teddy Bear Ornament
Pinecones & Materials Needed ~
4 Pine cones -
White Spruce, Red Spruce,
Small Douglas Fir
or
Small Colorado Blue Spruce.
for Arms & Legs
1 Large and 1 Medium
Austrian Black Pine, or
Pitch Pine Cones with a flat bottom.
2 petals cut from Eastern White Pine.
Glue Gun &
Glue Sticks
Small, thin ribbon
How to Put it All Together ~
Use the large cone for the tummy and the medium cone for the head.
1. With base of cones at back, shimmy the petals of the medium pinecone into the petals of the large pinecone.
2. Glue the Pinecones together.
3. Glue arm cones at the point the head and body cones meet. They tuck in real nice there. Then glue the leg cones into the bottom of the big pinecone.
4. Use 2 pinecone petals for the ears. Glue between the petals of the pinecone head.
5.
For decoration, I like to make a little ribbon bowtie or flower and glue it the front of the teddy bear where the head and tummy cones meet!
This is still my Favorite decoration all year 'round! ~ They make great gift. Can also be tucked in with the bow on top of a wrapped gift ~
The
PineConeLady
~
~ Pinecone Angel ~
Another Favorite Decoration to make! Pine cone Angels are great
for Holiday Ornaments,
but they are Wonderful all year 'round!
I attach one or two Pinecone Angels to my Baby Shower or Christening Gifts. I also created "theme" Angels and give them as gifts to my
Friends. An example would be my "Kitchen Angel" that is hung in their kitchen. A cute decoration and a way to remember that I am "hanging around" and am always there if they need me.
<3
I also
make an Angel and a Teddy Bear Ornament to give to a Mom or Daddy. A little imagination and thoughtfulness goes a long way!
Pinecones & Materials Needed ~
Pinecone for Angel Body:
You can use a Douglas Fir, Scotch Pine, White Spruce
or a small pinecone.
For the Head:
Sweetgum pod / ball or a large roundish Acorn
You can also use a small round wooden bead or ball that would be
in proportion to the body.
Paint a little face on the Acorn or Bead. If you decide to spray paint the body and head, paint the face on after they are dry.
For the Halo:
Silver or Gold Pipe Cleaner made into a circle that attaches to the head.
You can also use a small string of metallic beads.
For the Wings:
2 silk leaves spray painted gold or silver
You can also cut stiff lace into 2 wings or use a wide piece of lace that you gather
then tie in the center for 'ruffled' wings.
I have used bow-tie noodles for the wings when making this craft with kids.
Somehow, kids really love to craft with noodles, eh?!
Materials:
Metallic Spray
Paint or White Spray Paint
Clear Spray Polyurethane
Glue Gun & Glue
Sticks
Thin Metallic Cord or thin Organza Ribbon
How to Put it All Together ~
1. Glue the Acorn Head to the Pinecone Body. Let dry completely.
If you choose to, spray paint the head and body metallic or white.
I leave my pinecone and acorn natural most of the time.
2. Glue whichever type of wings you chose, to the back of the pinecone between the head and the body.
3.Take your the small circle of metallic beads or pipe cleaner and tie the ribbon or metallic cord to both sides. Glue the halo on top of the head.
I have found that this way of attaching the ribbon or cord keeps the angel hanging straight.
If you prefer to make your angel look as though it's flying over you, tie the cord around the 'neck' before adding the wings. This will make the angel tilt forward when it's hanging.
4. Make sure to spray the entire Angel with
Clear Polyurethane
Spray to preserve it.
This is another fun craft to do with children!
Just have the metallic spray painted items ready to go ahead of time.
~ PineConeLady's Favorite Thanksgiving Pinecone Turkey ~
A fun, colorful table decoration or for place settings at Thanksgiving dinner.
Pinecones & Materials Needed ~
Pine cones ~ Austrian Black Pine or Slash Pine
for a big Turkey.
Red Spruce for head
1 red Chenille Stem for Neck
Feathers
Glue that dries clear
How to Put it All Together ~
1. To make a Pinecone Turkey, cut off the pointed tip of a cone and glue to the other end of a pipe cleaner for the neck. {Called
Chenille stems too. }.
2.
Add a very small cone for the head. You can also made the head with a piece of styrofoam, or modeling clay.
3.
Glue red string or yarn wattles to the turkey's head.
4.
Glue on Chenille stems for legs, then bend and fold the end over to make the feet and glue to a piece of bark, wood or cardboard so it {the turkey} can stand upright.
5.
I make the turkey tail with 7 feathers.
6.
Dip the end of each feather into the glue and tuck it between the pinecone petals near back end.
7.
One in the middle, then three on each side, one
behind the other like a fan.
8.Do different colored feathers, or all the same. Really looks great! You can even tuck a name card in the pinecone as well ~
~ Pinecone Easter Tree ~
One Longleaf Pinecone spray painted any pretty pastel color.
Glue Small multi-color Putka Pods and small Easter theme items onto each
of the Pinecone Petals.
Top off with a small bow at the top! You can also use a cute bunny on the top as well.
This is a great and simple craft to do with kids!
~ PineConeLady Easter Bunny Ornament ~
Pinecones & Materials Needed:
4 Pinecones for Arms & Legs - Choose from: White Spruce, Red Spruce,
Small Douglas Fir.
1 Large and 1 Medium Austrian Black Pine, or Pitch
Pine Cones.
2 petals cut from
The TOP of a Longleaf Pine.
{They are long and thinner}
Glue Gun & Glue
Sticks
Small, thin ribbon
How to Put it All Together ~
1. Use the large cone for the tummy and the medium cone for the head.
2.
With base of cones at back, shimmy the petals of the medium pinecone into the petals of the large pinecone.
3.
Glue the Pinecones together.
4.
Tuck & glue arm cones at the point where the head and body pine cones meet.
5.
Glue the legs into the bottom of the big pinecone.
6.
Use the 2 pinecone petals for the ears. Glue between the petals of the pinecone head.
7.
For decoration, I like to make a little ribbon bow and glue it where the head and tummy cones meet!
We are Revamping the Website with photos and worksheets in
2026!
If you have a Suggestion, let us know! |

 PineConeLady
Holiday Pinecone Craft Projects
PineConeLady
Holiday Pinecone Craft Projects